
A week or so ago Ataul Munim showcased his work building the Monzo Plus card selection animation using a custom view. The animation is fantastic! I love reading blog posts on how Android developers have created more complex animations as I feel it can be quite difficult to do. It's definitely getting better and easier though. I recommend you go read that post before we get started, the rest will make more sense if you do.
At the bottom Ataul asked the reader "Could you do it with MotionLayout..." well sir, it just so happens I love MotionLayout.
Now I assume you have some basic knowledge of MotionLayout when reading this, if you don't, then go here and read the posts from Nicolas Roard. Otherwise you can just gaze at the pretty animations 😍
Before we start
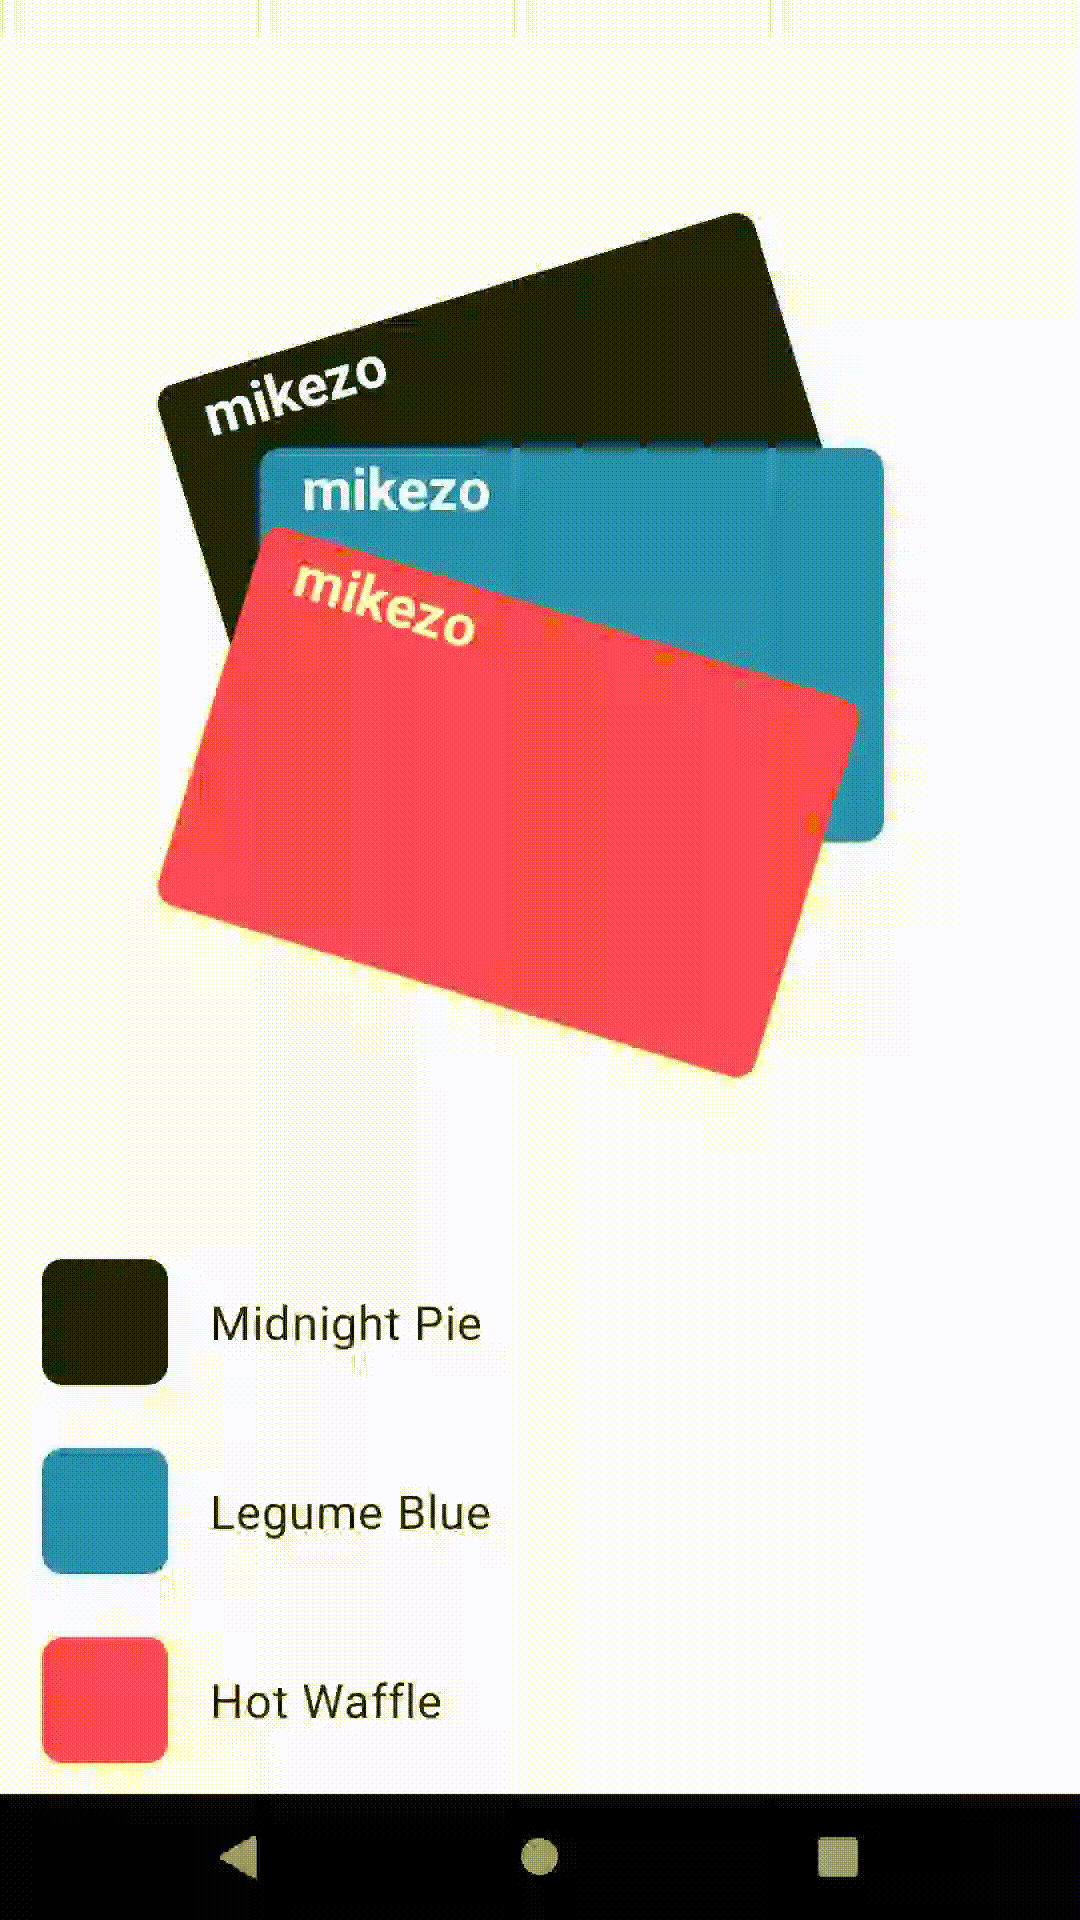
Let's get some basics out of the way. We have 3 different coloured MaterialCardViews that represent our Mikezo™️ credit card in our layout. They are positioned centrally in the screen and stacked on top of each other. The cards look like this:
<com.google.android.material.card.MaterialCardView
    android:id="@+id/bottomCard"
    android:layout_width="0dp"
    android:layout_height="150dp"
    android:backgroundTint="@color/midnightSky"
    app:cardCornerRadius="8dp"
    app:layout_constraintBottom_toTopOf="@id/cardTypeScrollView"
    app:layout_constraintDimensionRatio="1.586"
    app:layout_constraintEnd_toEndOf="parent"
    app:layout_constraintStart_toStartOf="parent"
    app:layout_constraintTop_toTopOf="parent">

    <TextView
        android:layout_width="wrap_content"
        android:layout_height="wrap_content"
        android:paddingStart="16dp"
        android:paddingEnd="16dp"
        android:text="@string/mikezo"
        android:textColor="@color/white"
        android:textSize="22sp"
        android:textStyle="bold" />

</com.google.android.material.card.MaterialCardView>
We also have some rows for buttons at the bottom of the layout for switching cards. We'll need them later but they're not important right now. You can see the whole layout here.
I want to point out, there's nothing special about this layout. All the "magic" is going to take place in our MotionScene.
Fan out and reveal
First we'll recreate the animation where the cards fan out at the start. In our MotionScene (where the magic happens) we need a start state (start) and an end state (fanOut).
<ConstraintSet android:id="@+id/start" />

<ConstraintSet android:id="@+id/fanOut">

    <Constraint android:id="@+id/bottomCard">
        <Transform
            android:rotation="-17"
            android:translationX="-12dp"
            android:translationY="-60dp" />
    </Constraint>

    <Constraint android:id="@+id/middleCard">
        <Transform android:translationX="12dp" />
    </Constraint>

    <Constraint android:id="@+id/topCard">
        <Transform
            android:rotation="17"
            android:translationX="-12dp"
            android:translationY="60dp" />
    </Constraint>

</ConstraintSet>
Now, you might be a little confused. Why are there no constraints in the start constraint set? That's because we don't need to change anything for our start state. We're going to leave the cards as they are in the layout.
The fanOut state is a little different. Stealing Borrowing all the settings from Ataul's blog post we:
- Set our bottom card at a slight angle of
-17ºand translate it back-60dpand up. - Set the top card to a slight angle of
17ºand translate it back-60dpand up. - Translate the middle card's X
12dpso it moves right slightly.
That's our states sorted so now we need a Transition to drive it. The original animation plays automatically as the screen is opened. This means we can take advantage of the new autoTransition attribute released in alpha5.
<Transition
    android:id="@+id/startToFanOut"
    app:autoTransition="animateToEnd"
    app:constraintSetEnd="@+id/fanOut"
    app:constraintSetStart="@+id/start"
    app:duration="1000"
    app:motionInterpolator="bounce">
</Transition>- We set
autoTransitiontoanimateToEnd.autoTransitionhas 5 options (maybe a future MotionLayout Quickie!). This means when our MotionLayout is in ourstartstate it will automatically transition to thefanOut(end) state. - Set an animation duration of
1second, mostly for effect! - Use the
bounceinterpolator as we can't use anOvershootInterpolatorwithMotionLayoutcurrently. This is because in aMotionLayoutour transitions progress go from 0 to 1 and an overshoot interpolator takes it past 1. Hopefully we'll get it in future! Butbouncegives a similar effect that's good enough. Let's take a look:
Ruh-roh! We have an issue. The animation starts before we even see the cards in their start state. There's probably a couple of ways we can solve this (we could use stagger for instance). But we're going to take the opportunity to try something I've been thinking about with autoTransitions and that's a delay. Currently there's no way to specify a delay for a Transition, but we can do a bit of trickery and create one ourselves. In our MotionScene we can add a new ConstraintSet which, just like our start state does nothing but use our layout.
<ConstraintSet android:id="@+id/delayStart" />

<ConstraintSet android:id="@+id/start" />
We can then add a new "fake" Transition whose sole purpose is to delay the fanOut transition:
<Transition
    android:id="@+id/delayStartTransition"
    app:autoTransition="animateToEnd"
    app:constraintSetEnd="@+id/start"
    app:constraintSetStart="@+id/delayStart"
    app:duration="600" />

<Transition
    android:id="@+id/startToFanOut"
    app:autoTransition="animateToEnd"
    app:constraintSetEnd="@+id/fanOut"
    app:constraintSetStart="@+id/start"
    app:duration="1000"
    app:motionInterpolator="bounce">
</Transition>
In our new delayStartTransition we:
- Set the
constraintSetStarttodelayStartandconstraintSetEndtostart - Add an
autoTransitionusinganimateToEndagain - Set the
durationto 600 (our delay).
Everything else stays the same for our other Transition.
Much better!
Collating the Cards
Now we need to collate the cards and end up with the coral/hot waffle card on top. This will happen after a card has been selected. We need a Transition once again as our driver.
<Transition
    android:id="@+id/fanOutToCollapseCards"
    app:constraintSetEnd="@+id/topCardOnTop"
    app:constraintSetStart="@+id/fanOut"
    app:duration="600" />
Nothing remarkable about this. We go from the fanOut state to a new topCardOnTop state (great naming).
<ConstraintSet android:id="@+id/topCardOnTop">

<Constraint android:id="@+id/bottomCard">
    <Transform
        android:elevation="1dp"
        android:rotation="7" />
</Constraint>

<Constraint android:id="@+id/middleCard">
    <Transform
        android:elevation="1dp"
        android:rotation="-7" />
</Constraint>

<Constraint android:id="@+id/topCard">
    <Transform android:elevation="4dp" />
</Constraint>

</ConstraintSet>
Again, we can borrow Ataul's settings:
- We set
rotationon the bottom and middle cards by7ºand-7ºrespectively to give them that unorganised look. We do this in ourTransformblock which can handle other things liketranslation. - We set the
elevationon the bottom and middle card to1dpand the top to4dp. This ensures that our hot waffle card is on top of the others.
If we select the top card after the fanOut transition we can see the result.
Card select animation
This is where things get a little trickier. In the gif above, we make the easy choice and select the top card (hot waffle). This can also be considered the middle state when we select either the bottom and middle card, we first collapse to the top card and then our selected card moves to the top.
We're going to need to do this programmatically. This is because when we select a card we can end up in 3 distinct states; topCardOnTop, middleCardOnTop and bottomCardOnTop.
We can create the latter 2 states to go along with our already defined topCardOnTop state as we know what they'll be.
<ConstraintSet android:id="@+id/bottomCardOnTop">

    <Constraint android:id="@+id/bottomCard">
        <Transform android:elevation="4dp" />
    </Constraint>

    <Constraint android:id="@+id/middleCard">
        <Transform
           android:elevation="1dp"
           android:rotation="7" />
    </Constraint>

    <Constraint android:id="@+id/topCard">
        <Transform
           android:elevation="1dp"
           android:rotation="-7" />
    </Constraint>

</ConstraintSet>

<ConstraintSet android:id="@+id/middleCardOnTop">

    <Constraint android:id="@+id/bottomCard">
        <Transform
           android:elevation="1dp"
           android:rotation="7" />
    </Constraint>

    <Constraint android:id="@+id/middleCard">
        <Transform android:elevation="4dp" />
    </Constraint>

    <Constraint android:id="@+id/topCard">
        <Transform
           android:elevation="1dp"
           android:rotation="-7" />
    </Constraint>

</ConstraintSet>
You'll notice this are just different variations of the topCardOnTop state, where the card selected has an elevation of 4dp and the cards not selected have rotation and an elevation of 1dp applied.
Now if we just used the same Transition we used for the top card, replacing the end state with either the above the card would literally just appear on top. We wouldn't get the nice slide out effect. We're going to need to alter the cards animation path. We can use KeyFrames to help us achieve this.
A KeyAttribute is a type of KeyFrame. It lets us modify attribute values on a View, allowing us to manipulate them at certain times in the animation. This is exactly what we want to do, we want them to end up the way we've defined them in our states, we just want to slightly change how they get there. An intermediary step. Let's look at the topCardToBottomCard Transition.
<Transition
    android:id="@+id/topCardToBottomCard"
    app:constraintSetEnd="@+id/bottomCardOnTop"
    app:constraintSetStart="@+id/topCardOnTop"
    app:duration="600"
    app:motionInterpolator="easeOut">
    <KeyFrameSet>
        <KeyAttribute
            android:rotation="45"
            android:translationX="125dp"
            android:translationY="-200dp"
            app:framePosition="50"
            app:motionTarget="@+id/bottomCard" />
    </KeyFrameSet>
</Transition>
With our KeyAttribute
- We target the bottomCard as this is the one being selected
- Move the card out
125dpand up200dpusingtranslationXandtranslationY. - We set
rotationto45ºjust like the original animation. - This all happens halfway through the animation by setting the
framePositionto 50.
As the card on top's elevation is always set to 4dp in our end state we know that halfway through our animation our card will be at 2dp which means there won't be a clash when it comes back on to the stack. Remember a KeyFrame is just a manipulation at a point in time, our Transition will always finish up in the end state.
We're going to need 6 total Transitions as we have 3 cards and 2 possible end states with either of the other cards on top. We can just copy the above Transition and changes the start and end states where appropriate and target the correct cards.
We can't drive these Transitions by using an OnClick handler on our buttons. Why? Well we have no way of knowing what state we're currently in (which card is selected) and where we should be going. We can't define that in our MotionScene. We can however figure this out in code.
Pick a card, any card
When we need a little more control we can jump back into code with MotionLayout. We're going to need listeners for our buttons, some way to know what state we're in and the ability to trigger the correct Transition. We can do that in the onCreate of our Activity.
card1Button.setOnClickListener {
    when (root.currentState) {
        R.id.fanOut -> {
            root.setTransition(R.id.fanOut, R.id.topCardOnTop)
            root.transitionToEnd()
            collapsedCardCompletedListener(R.id.bottomCardOnTop)
            midnightPieCheckBox.isVisible = true
        }
        R.id.bottomCardOnTop -> {
            Log.d("Mikezo", "Card 1 already on top")
        }
        R.id.middleCardOnTop -> {
            root.setTransition(R.id.middleCardOnTop, R.id.bottomCardOnTop)
            root.transitionToEnd()
            ...
        }
        R.id.topCardOnTop -> {
            root.setTransition(R.id.topCardOnTop, R.id.bottomCardOnTop)
            root.transitionToEnd()
            ...
        }
    }

    private fun collapsedCardCompletedListener(@IdRes endStateId: Int) {
        root.setTransitionListener(object : TransitionAdapter() {

            override fun onTransitionCompleted(motionLayout: MotionLayout, currentId: Int) {
                if (currentId == R.id.topCardOnTop) {
                    root.setTransition(R.id.topCardOnTop, endStateId)
                    root.transitionToEnd()
                }
                root.setTransitionListener(null)
            }
        })
    }
}
When a card button is clicked we switch our actions based on the current state the MotionLayout is in by calling root.currentState()
- If we're in the
fanOutstate we always need to go to thetopCardOnTopfirst, wait for thatTransitionto end and then move to thebottomCardOnTopstate. We can do this by setting aTransitionListeneron the root, waiting for theonTransitionCompletedcallback and then triggering our secondTransition. In our case we're using theTransitionAdapterclass so we don't have to override all theTransitionListenercallbacks. This is all encapsulated in thecollapsedCardCompletedListenerfunction - If the bottom card is on top already we do nothing
- If it's the
middleCardOnToportopCardOnTopstates, we set the start state to the respective state and then our end state tobottomCardOnTopand proceed to calltransitionToEndto play the animation
In all cases MotionLayout is helping us out. It will search through the Transitions we created in our MotionScene and find one that has a matching start and end state. This is handy as it means we don't have to programmatically create all the KeyAttributes for each Transition, we can keep them in the Transitions in the MotionScene.
We just need to rinse and repeat this for the middle and end buttons, adjusting our when statement appropriately.
And there we have it! The Mikezo™️ Plus Card selection animation
Now we could add more functionality e.g. allow for different coloured cards to be selected, add swiping instead of clicking but that's for another time.
You can find all the repository containing the code here. The PR is here. This repo also contains the demos for my talk "Do the Loco-MotionLayout" presented at droidcon Italy and droicon Boston. You can watch it here.
Is there something I could have done better? Hate the name of my new challenger bank? Don't know what Legume Blue is? Have you ever replaced a lightbulb with an orange? Hit me up on Twitter.
Thanks for reading!
